This is general information about things to be considered when choosing an AFM probe for nanomechanical characterization. This has become an increasingly widespread AFM application, finding use in biology, soft matter, or deformable electronics. Here we will provide a brief guideline on the process behind choosing the correct probe for an AFM nanomechanics study.
![]() Need advice on selecting the right AFM probe? – Contact us for help!
Need advice on selecting the right AFM probe? – Contact us for help!
When choosing the correct AFM probe, you should first make sure that you are studying your sample using an appropriate technique for your objectives. Several factors must be considered. Firstly, what is the type of data required – quantitative or qualitative. Then, a user must consider the nature of the sample – i.e. its heterogeneity, adhesive properties, surface roughness among others. Next the desired resolution should be determined – e.g. a detailed image or a highly pixelated map. Lastly, the user must settle on an acceptable level of tip sample interaction – ranging from no contact, through sporadic tapping to prolonged contact or even indentation.
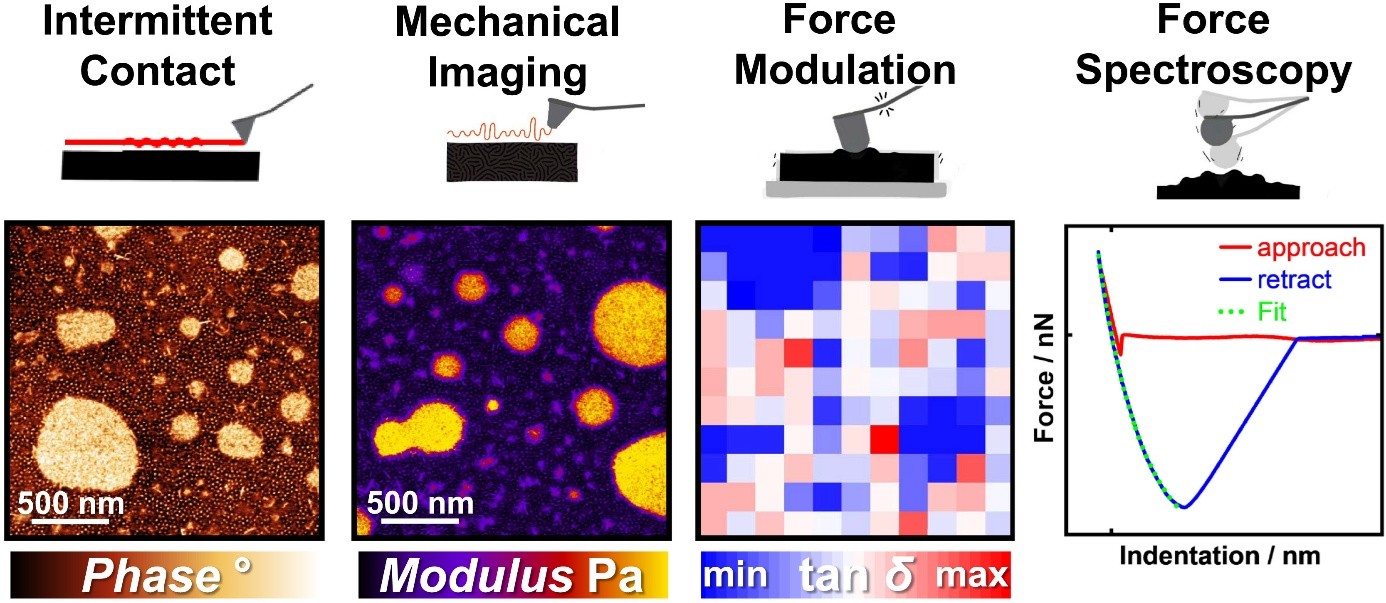
Common AFM nanomechanics experimental approaches to choose from are:

Figure 1 Graphical summary of common AFM operation modes. Image taken from Kim E., et al., “A guide for nanomechanical characterization of soft matter”, STAR Protocols, 2025. Used under CC BY 4.0 license (https://creativecommons.org/licenses/by/4.0/)
1.1 Intermittent contact mode - Oscillating a cantilever at or near its resonant frequency in feedback mode. This mode offers detailed imaging in monitoring the piezo height and phase channels of the AFM. Mechanical information is recorded in the phase image and strongly contributes to the observed contrast. Setup is quick, with minimal calibration required to produce a sharp image. Mechanical information is only qualitative.
1.2 Nanomechanical imaging – A controlled force is applied to the sample. Reports much more quantitative mechanical data than intermittent contact, but requires significantly more calibration. Still offers good imaging resolution.
1.3 Force-modulated measurements – A frequency sweep is performed at a force setpoint. Allows for detailed mechanical information, essentially providing dynamic mechanical analysis at the nanoscale. Typically done with larger area AFM tips, resulting in lower spatial resolution. Longer calibration and measurement times.
1.4 Force spectroscopy – The AFM tip is pressed against the sample surface in a linear ramp, with the force continuously sampled during piezo extension, giving a full force-distance curve. Allows for accurate data at a given point, but requires calibration prior to the experiment. Potential for contamination is high, due to direct contact.

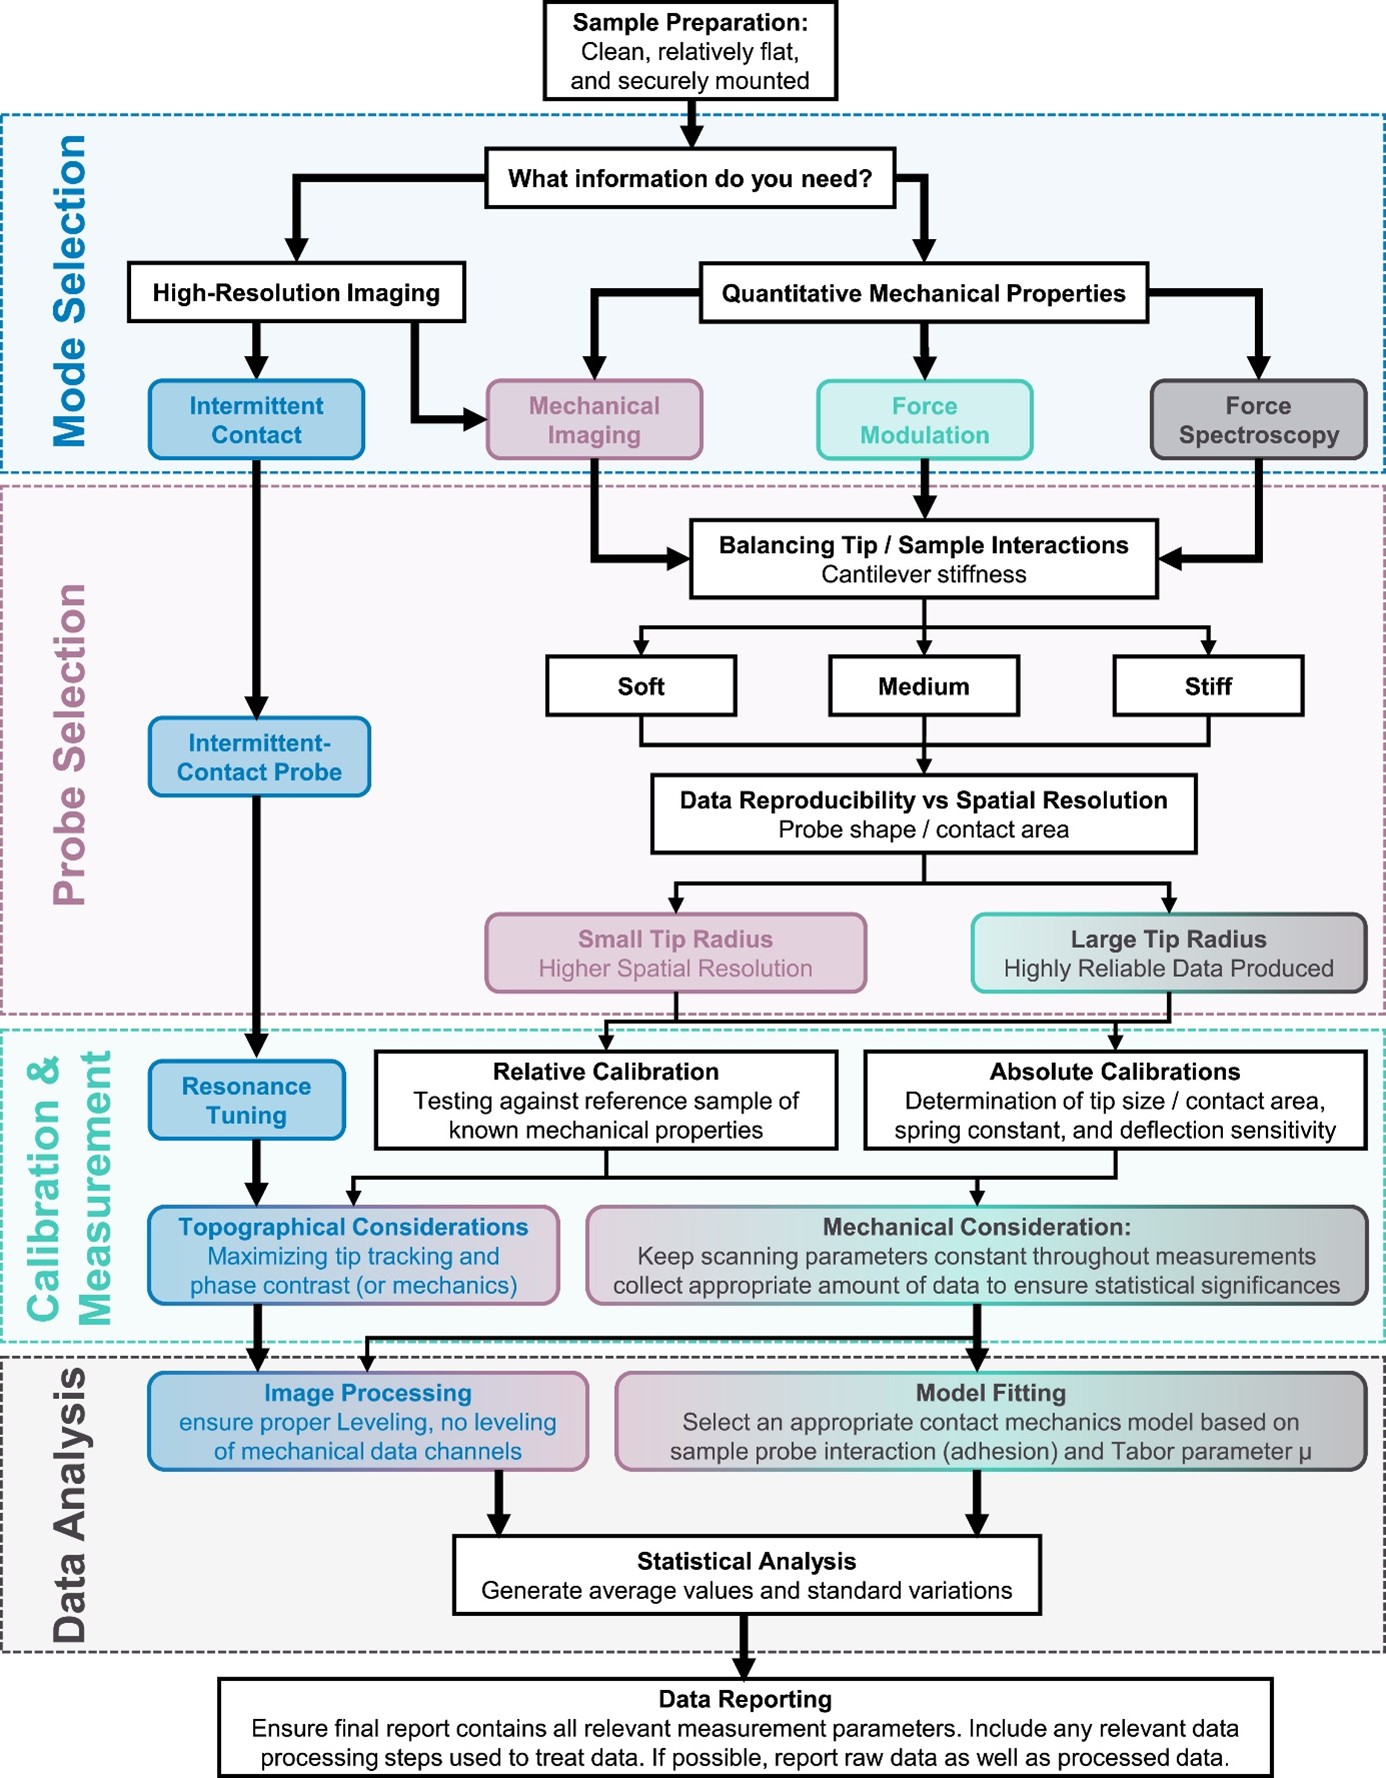
2.1. The spring constant of the AFM probe cantilever should be appropriate for the given sample stiffness. That is to say, at the force range of interest, deflection of the cantilever should be similar in size to the sample indentation, ideally. Too stiff an AFM cantilever will not deflect, and may even unknowingly damage a sample, while the other extreme would not provide meaningful data as the sample will not deform. In case of very strongly adhesive samples, it can be useful to aim for an AFM probe with a stiffer cantilever.
2.2. The shape of the AFM tip determines the force constant of the tip-sample interaction. Larger radius AFM tips indent a larger area, displacing more material, and leading to a larger tip-sample interaction for a given indentation. Smaller radius AFM tips improve lateral resolution, but can be damaging on softer samples.
2.3 An intuition for contact mechanics is very useful in making the correct judgement for using the correct probe. A suitable approach can be made using the following algorithm:
2.3.1. Estimate the Young’s modulus, E, (stiffness) of the sample, from literature or bulk measurements.
2.3.2. An estimate of the sample stiffness can be made by assuming that keff ≈ 2Ea, where a is the contact radius.
2.3.3. Choose a cantilever with a spring constant, k, that is equal or slightly higher than keff.
2.3.4. The cantilever can be even stiffer in the case of strongly adhesive samples.

The next important step is calibration, which allows us to ensure quantitative and reliable measurements. Calibration can be either relative—prioritizing faster implementation and comparative studies, but offering limited cross-instrument comparability—or absolute, which is necessary when precise property values are required, though it is often significantly more time-consuming. Specific parameters that can be calibrated are:
3.1. Spring constant – manufacturer provided values are nominal. For accurate results calibration must be performed, by one of several common methods:
3.1.1. Thermal tuning – which relies on the equipartition theorem to estimate the AFM cantilever spring constant from thermal noise.
3.1.2. Sader method – statistical approach based on AFM cantilever plan view dimensions, material properties, resonant frequency and Q-factor.
3.1.3. Reference spring method – involves pressing the cantilever against a previously calibrated cantilever.
3.2. Deflection sensitivity – once the spring constant is known, we must calibrate how deflection of the spring is reflected on the detector voltage signal. Typically, this is done by measuring a force-curve on a hard, non-deformable surface. The slope of the curve in the contact region would give a sensitivity in terms of piezo travel distance/voltage.
3.3. AFM tip area estimation – can be performed via several methods:
3.3.1. Direct imaging (through SEM or in some cases even through optical methods)
3.3.2. AFM tip reconstruction – AFM imaging a sample of known features and digitally processing the resulting image.
3.3.3. Nanoindentation – indenting a sample of known modulus and deriving the mechanical properties from there.
3.4. A generalized, systematic procedure would have these key steps, in summary:
3.4.1. Determine the AFM cantilever spring constant.
3.4.2. Measure the deflection on a hard (i.e. one that will not deform), flat surface
3.4.3. Estimate the AFM tip area
3.4.4. Validate the calibration with well-characterized samples 3.4.5. Periodically recalibrate the AFM probe, especially after prolonged use or environmental changes.

Proper analysis and reporting is crucial for impactful results.
4.1. Firstly, one should be mindful of common AFM tip artifacts in imaging (https://www.nanoandmore.com/afm-tip-shape-effects)
4.2. Subsequently, image processing techniques such as brightness/contrast adjustments, or leveling must be performed prior to any analysis. Those can introduce artifacts of their own and could jeopardize result quality, if they are applied without consideration.
4.3. Following that, common data analysis approaches could be statistics on pixel values, cross-correlation analysis of different image channels (e.g. height and phase). In some applications, such as force spectroscopy, it is necessary to apply quantitative models to extract a relevant mechanical value. Detailing this is beyond the scope of this text, but care should be taken with regards to adhesive interactions, and details such as determining the contact point of the measurement.
4.4. In reporting the data, it is important to get across many details – starting with basic experimental details, such as AFM system, operation mode and AFM probe used, through calibration, sample preparation and data processing pipeline. While most of these details are beyond the scope of this text, properly reporting the AFM probe used deserves special mention. Care should be taken to write down the AFM probe model correctly – AFM probe names are rarely proper nouns, and frequently feature alphanumeric codes and punctuation, which can make them challenging to remember and format properly. Reproducing the name faithfully, however, allows other researchers to reproduce an experiment with much less ambiguity.

In conclusion, in order to do rigorous AFM experiments, the above protocol serves as an excellent starting point. A recent open-access academic review by Kim et al.(1), has covered all the topics mentioned in this text in depth and features an extensive bibliography for further research.

Figure 2 Comprehensive decision-tree for AFM nanomechanical measurement. Image taken from Kim E., et al., “A guide for nanomechanical characterization of soft matter”, STAR Protocols, 2025. Used under CC BY 4.0 license (https://creativecommons.org/licenses/by/4.0/)
(1)
Kim, E.; Ramos Figueroa, A. L.; Schrock, M.; Zhang, E.; Newcomb, C. J.; Bao, Z.; Michalek, L. A Guide for Nanomechanical Characterization of Soft Matter via AFM: From Mode Selection to Data Reporting. STAR Protocols 2025, 6 (2), 103809. https://doi.org/10.1016/j.xpro.2025.103809.
